코드로 오토레이아웃을 구현하는 다른 방법인 NSLayoutConstraint 인스턴스 생성을 사용하여 제약 조건을 지적하는 방법에 대해 공부해보자.
NSLayoutConstraint(item: button,
attribute: .right,
relatedBy: .equal,
toItem: textField,
attribute: .left,
multiplier: 1.0,
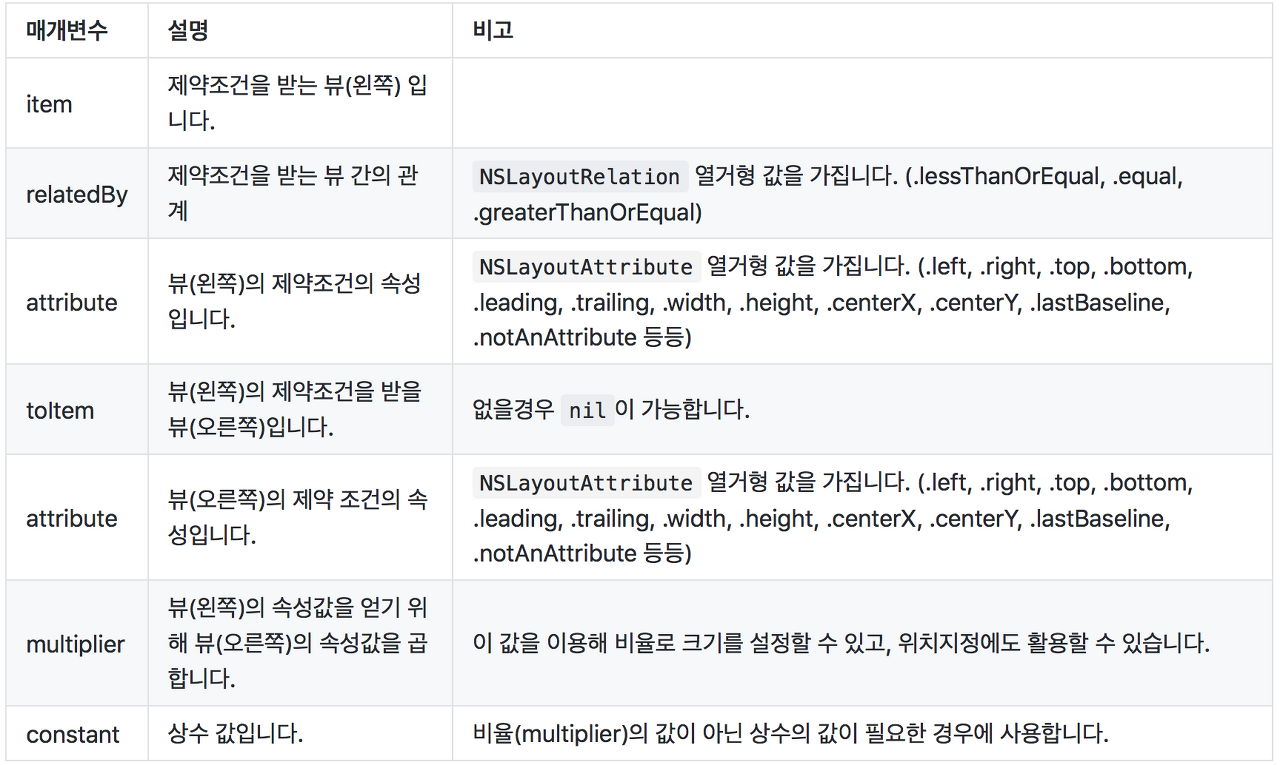
constant: 8.0)button과 textField에 기본간격 (Standard Space, iOS 11 기준 8포인트)에 제약을 주기 위해 NSLayoutConstraint 인스턴스를 생성하는 코드이다.
제약조건을 받는 (item) 버튼(기준은 왼쪽) 버튼과
(attribute) 뷰의 제약조건의 속성은 right(아 그러니까 오른쪽을 기준으로 제약을 받겠다 라는 의미인듯),
(relatedBy) 제약조건을 받는 것은 동일하게 (그러니까 정렬을 한다는 소리일듯),
(toItem) 버튼의 제약을 받을 텍스트 필드,
(attribute) 이번엔 텍스트 필드의 제약조건의 속성은 left(왼쪽을 기준으로 제약을 받는다.)
(multiplier) 떨어진 길이는 1배, (constant)비율이 1 이었으니까 1 * 8 만큼 떨어진 공간 제약.
이렇게 해석이 될 듯 하다.
NSLayoutConstraint(item: button,
attribute: .width,
relatedBy: .greaterThanOrEqual,
toItem: nil,
attribute: .notAnAttribute,
multiplier: 1.0,
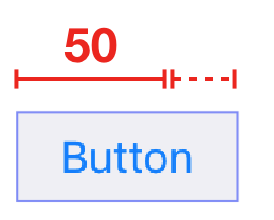
constant: 50.0)button 의 너비가 50보다 크거나 같도록 넓이 제약(Width Constraint)을 줄 수 있는 NSLayoutConstraint 인스턴스 생성 코드.

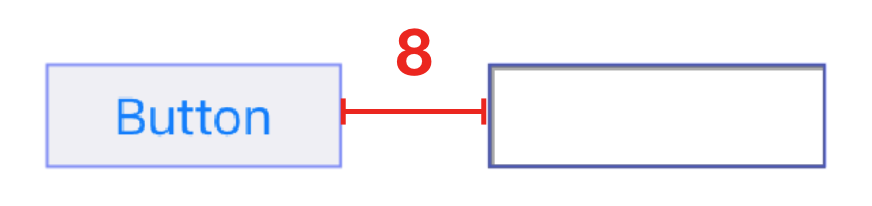
 NSLayoutConstraint(item: purpleBox,
 			  attribute: .left,
 			  relatedBy: .equal,
 			  toItem: self.view,
 			  attribute: .left,
 			  multiplier: 1.0,
 			  constant: 50.0)

 NSLayoutConstraint(item: purpleBox,
 			  attribute: .right,
 			  relatedBy: .equal,
 			  toItem: self.view,
 			  attribute: .right,
 			  multiplier: 1.0,
 			  constant: -50.0)
purpleBox 가 SuperView를 기준을 왼쪽(Leading) 간격은 50포인트, 오른쪽 (Trailing) 간격은 50포인트로 설정한다.
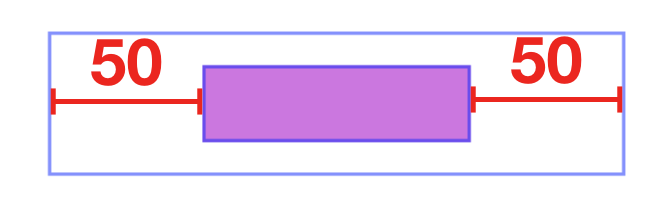
 NSLayoutConstraint(item: topField,
 			  attribute: .bottom,
 			  relatedBy: .equal,
 			  toItem: bottomField,
 			  attribute: .top,
 			  multiplier: 1.0,
 			  constant: -10.0)
topField와 bottomField의 세로 사이의 간격을 10 포인트로 설정한다.(Vertical Layout)
 NSLayoutConstraint(item: maroonView,
 			  attribute: .right,
 			  relatedBy: .equal,
 			  toItem: blueView,
 			  attribute: .left,
 			  multiplier: 1.0,
 			  constant: 0.0)
maroonView와 blueView의 간격이 없다(Flush Views)

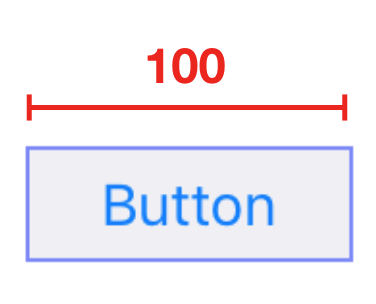
 NSLayoutConstraint(item: button,
 			  attribute: .width,
 			  relatedBy: .equal,
 			  toItem: nil,
 			  attribute: .notAnAttribute,
 			  multiplier: 1.0,
 			  constant: 100.0).priority = UILayoutPriority(rawValue: 20)
button의 너비는 100포인트이고 우선도는 20으로 설정한다(Priority)
Tip : 오토레이아웃에서는 뷰에 제약을 적용할 때, 어떤 제약을 우선시해야 하는지를 우선도로 결정한다. 만약 하나의 속성(attribute)에 적용할 수 있는 두 개 이상의 제약이 있다면 그중 우선도가 높은 제약이 적용된다. 우선도는 1 부터 1000까지의 정수로 표현할 수 있다.
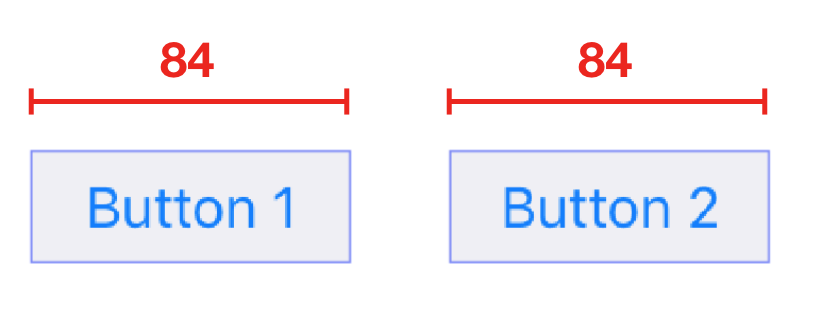
 NSLayoutConstraint(item: button1,
 			  attribute: .width,
 			  relatedBy: .equal,
 			  toItem: button2,
 			  attribute: .width,
 			  multiplier: 1.0,
 			  constant: 0.0)
button1과 button2의 너비 값이 같도록 제약을 생성한다. (Equal Widths)
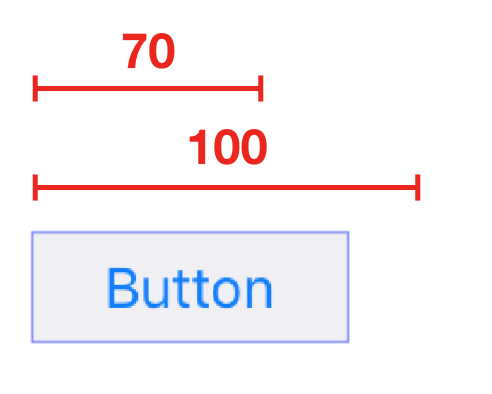
NSLayoutConstraint(item: flexibleButton,
 			  attribute: .width,
 			  relatedBy: .greaterThanOrEqual,
 			  toItem: nil,
 			  attribute: .notAnAttribute,
 			  multiplier: 1.0,
 			  constant: 70.0)

 NSLayoutConstraint(item: flexibleButton,
 			  attribute: .width,
 			  relatedBy: .lessThanOrEqual,
 			  toItem: nil,
 			  attribute: .notAnAttribute,
 			  multiplier: 1.0,
 			  constant: 100.0)
flexibleButton의 너비 값이 70포인트보다 크거나 같고 100포인트보다 작거나 같도록 제약을 생성합니다. (Multiple Predicates)
 // button1
 NSLayoutConstraint(item: button1,
 			  attribute: .left,
 			  relatedBy: .equal,
 			  toItem: self.view,
 			  attribute: .left,
 			  multiplier: 1.0,
 			  constant: 8.0)

 // button2
 NSLayoutConstraint(item: button2,
 			  attribute: .left,
 			  relatedBy: .equal,
 			  toItem: button1,
 			  attribute: .right,
 			  multiplier: 1.0,
 			  constant: 8.0)

 // textField
 NSLayoutConstraint(item: textField,
 			  attribute: .left,
 			  relatedBy: .equal,
 			  toItem: button2,
 			  attribute: .right,
 			  multiplier: 1.0,
 			  constant: 8.0)

 NSLayoutConstraint(item: textField,
 			  attribute: .width,
 			  relatedBy: .greaterThanOrEqual,
 			  toItem: nil,
 			  attribute: .notAnAttribute,
 			  multiplier: 1.0,
 			  constant: 20.0)

 NSLayoutConstraint(item: textField,
 			  attribute: .right,
 			  relatedBy: .equal,
 			  toItem: self.view,
 			  attribute: .right,
 			  multiplier: 1.0,
constant: -8.0)- button1, button2, textField와 superView의 간격은 표준 간격(8포인트)이며 textField의 너비 값은 20포인트보다 크거나 같도록 제약을 생성합니다. (A Complete Line of Layout)

Visual Format Language
위에서 NSLayoutConstraint를 이용해 만들었던 동일한 제약조건을 Visual Format Language를 이용해 만들어보겠습니다.
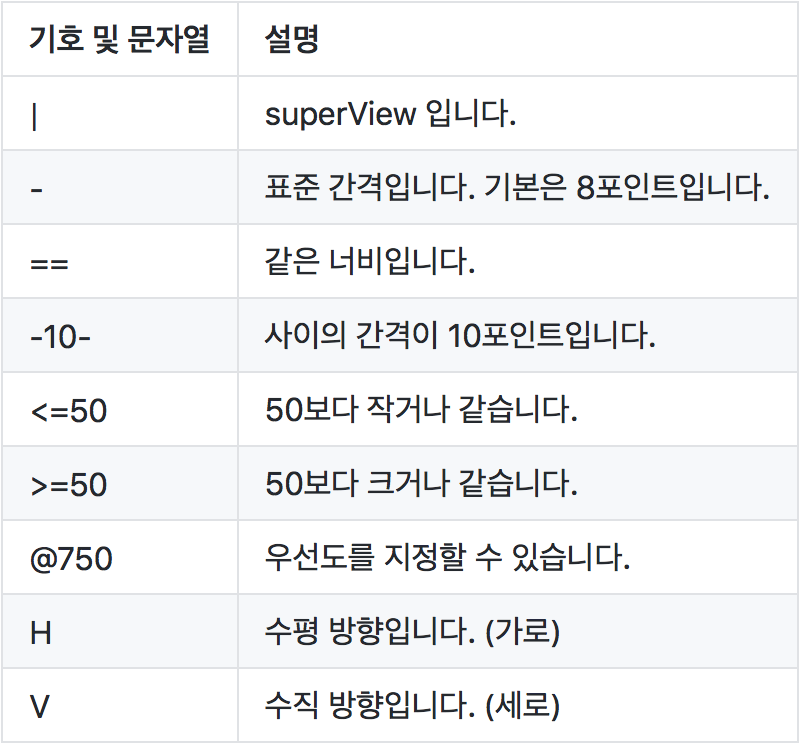
H:[button]-8-[textField] 또는 H:[button]-[textField]
H:[button(>=50)]
H:|-50-[purpleBox]-50-|
V:[topField]-10-[bottomField]

H:[maroonView][blueView]
H:[button(100@20)]
H:[button1(==button2)]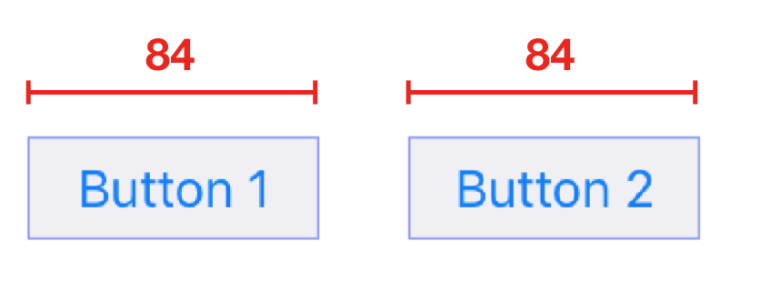
H:[flexibleButton(>=70,<=100)]
H:|-[find]-[findNext]-[findField(>=20)]-|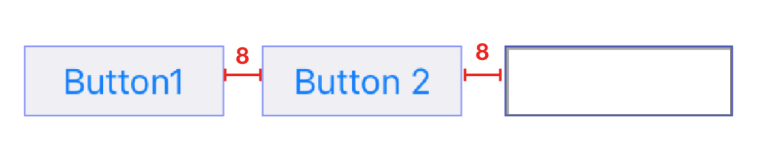
'Programming > iOS' 카테고리의 다른 글
| 오토 레이아웃(Auto Layout) (0) | 2021.07.01 |
|---|---|
| Foundation (0) | 2021.07.01 |
| 코코아 터치 계층(Cocoa Touch Layer) + UIKit (0) | 2021.07.01 |
| AVFoundation, Timer (0) | 2021.07.01 |
| UIButton, UISlider, UILabel (0) | 2021.07.01 |


댓글